Comment on the OVERALL SUCCESS of the SHOWCASE
Overall I believe the showcase was a success but it would have been a bigger success if Team 17 had actually shown up.
Did everything get done on time?
Everything for the showcase did get done on time but only just, our team’s final version of the trailer was completed only a day before the showcase.
What kind of things were in the Media Rooms?
In the media rooms there was examples of students work from the games and media courses on the display boards, there were folders out on one the tables that contained students work such as concept art and on the computers there was a slide show which showed work from different students on the courses.
What was on each BIG screen?
Throughout the whole of the showcase the four trailers made by the four teams were being shown on the big screen so that everyone at the showcase could see what the year two games students had produced throughout the year.
What were students doing?
During the showcase, students from the media and games courses were showing those who turned up to the showcase the work that they have done throughout the year, we had talks with future students about the course they had enrolled on and gave those future students a quick demo of the programs that they will start using.
What were the teachers doing?
During the showcase the teachers were talking to future students and their parents about the course they have chosen to do and what they’ll expect and they answered any questions that anyone might have had throughout the showcase.
What visitors did we have?
The visitors we had were mainly future students hoping to learn more about what they are going to learn on the course and what kind of work they will be creating. Team 17 were supposed to be visiting but they didn’t turn up. I'm not too sure who else visited because I was busy during most of the showcase so I didn’t find out.
What was the most enjoyable part of the day?
To me the most enjoyable part of the day was getting free pizza towards the end of the showcase.
Wednesday 30 June 2010
Reflection on trailers
Team Lazer Baby’s Tempus trailer
Three positives of the Tempus trailer are the 3d model detail, which was good and consistent throughout, the music used for the trailer fit really well and was edited to fit the scenes almost perfectly and the scenes were put together really well in the trailer.
One negative point about the Tempus trailer is that some of the splash screens and credits were a bit plain and boring and could have been improved with a flashy animation.
Team Negative one’s Desolate trailer
Three positives of the Desolate trailer are the atmospheric effects used in some of the 3d models, the wide variety of 3d environments created and the lighting techniques used in a few of the environments, which adds to the atmosphere even more.
One negative point of the Desolate trailer is the texture quality on one of the scenes wasn’t brilliant and could be improved by UVW text unwrapping the 3d model better.
Team 42’s Zero G trailer
Three positives of the Zero G trailer are the 3d models, which are very well made, the soundtrack they used fit brilliantly and the scenes of the trailer were put together really well.
One negative point to the Zero G trailer is that at certain parts of the trailer, the vehicle didn’t look very fluid as it was moving around the track and could be improved by adding more movement to the vehicle’s animation such as a shaking motion.
Team Paradox’s Dark shock trailer
Three positives of the Dark Shock trailer are the sound effects, which were used effectively, the scenes in the trailer were put together really well and some of the animations were excellent.
One negative point to the Dark Shock trailer was that the quality and detail on some of the models wasn’t brilliant and could have been improved with better use of textures.
Friday 25 June 2010
Reflection on Tempus trailer by team Lazer Baby
Here is the final trailer for Tempus, created by team Lazer Baby.
Here is a link to the trailer for Resident Evil 4, which is the kind of trailer that we were aiming for; http://www.youtube.com/watch?v=2ORc25vZo54
The final version of our team trailer didn’t completely match our original intentions because of complications in our team’s communication, which caused some team members to create extra scenes which weren’t in the original plans and other team members to create very little. Even though our final trailer only matched the original plans by a small amount, I believe that what we created in the end turned out better than the planning that we created. Below is an image of the storyboard that our team agreed to follow but didn’t really stick to.

I believe that the end trailer that we created is appropriate for our intended audience, which was aimed for people of both genders who are aged 12 and above. Our trailer was supposed to be for an 18+ game but we made sure the trailer contained nothing inappropriate as it was being shown at the digital showcase. The trailer is also friendly for people of all races and contains no offensive images such as knives, guns etc.
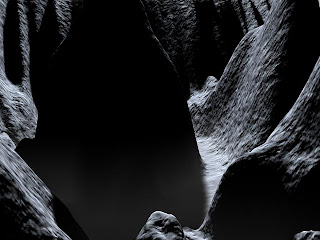
Our final team trailer contained three of my environments that I created in 3DS Max using a wide variety of different techniques. I created my mountain environment by using a displacement map that I had first created in Photoshop myself so that I could get the shape of the mountains to be the way I wanted them to be rather than mountains that look randomly generated. After I had the displacement strength at what I wanted, I had to tweak the vertices to make it smoother and get the mesh to fit better. To make the village environment I first added a displacement map to a plane using a noise texture from the material editor, which I then added a texture to make it look like snow. After I did this I merged my house that I box modelled, unwrapped and textured into this scene so that it would look like a village but I had to duplicate the house a number of times and place them the way I wanted so it would be more village like. The trees in the environment are 3ds max’s pre-made leaves and branches that have been put onto a branch that I have modelled and textured myself. Next I made a skybox with a tileable night sky texture on it, added an Omni light and lowered the intensity to make it look like it was night time, added a fog effect to a set area using a box gizmo and finally used a blizzard particle system to simulate the blizzard that is raging in my scene. I kept the animation for the camera straight forward and just had it go from one side of the environment to the other. Before I started making these environments, I first had to plan them out on paper, which I scanned on to computer to allow me to add colour in Photoshop. This was so I could get a general idea about what colours I was going to have the textures in the environments, which helped me out a lot. I would say that creating environments in 3DS Max is my biggest strength but there is still a lot I can do to improve on this and my biggest weakness is my drawing ability, specifically the drawing of characters.

The environments that I created for the team trailer are quite dark and gloomy because I felt that this style would fit the psychological horror game genre that we were aiming for. My original intention was to base some of the 3D environment models on medieval architecture and monastery style buildings but I never followed through with this plan and just made some things what I personally think should go in a horror game, which are dark forests, creepy ‘abandoned’ villages and dimly lit corridors where you can only just see what's there. On my mountain environment I did model a building that was based on the medieval style, which I am quite happy with. This made me think that I should have made more buildings in this style for my environments and if I had the choice to do this project again, I would model more. There was quite a few problems that I encountered during this project, one of which was the render times of some of my 3ds max models. These large render times were mainly because of the large poly count that some of my models had and also the realistic mental ray water effect that I used one of my models, which greatly increased render time by around 4-5 hours. I solved this problem by reducing the poly count of my models as much as I could and also by using the mental ray water as little as possible. Another problem that I have encountered are team mates who haven't contributing to the trailer as much as they should have. Me and Ethan have been doing a large majority of the work for the team trailer while Nat and Jack spend a lot of time off task looking at videos on YouTube or deviant art when they should be working on something for the trailer. I haven’t really been able to solve this problem because if they aren’t in a mood to work, I can’t change that. From this experience I have learnt to work and communicate in a team a lot better, I have learnt how to create even more realistic 3D models in 3DS max and I have learnt that not everything will go to plan when working on a project like this so I now know how to prepare for various problems that may occur. My skills in 3DS Max have increased dramatically throughout the course of this project, I have learned how make the textures look more realistic, use various types of lighting and effects like spotlights and fog to create more of an atmosphere to my environment. We only just met the deadline for this project because of different problems we had encountered throughout the project. The main problems which caused our team to finish the trailer one day before the showcase was the lack of communication between the team and two of the team members getting their renders done at the last second when they should have been done weeks ago. We would have finished the trailer weeks before the showcase if we had better time keeping but because of the various issues in the team, such as some members not doing their fair share of work, we had poor time keeping which almost caused us to miss the deadline.
I found working in a team quite enjoyable for the most part but it was hard working in a team with people who disagreed with each others ideas most of the time and who didn't contribute a fair amount of work to the trailers development. I think we would have been able to work alot better as a team if we communicated with each other more and contributed an equal amount of work to the project.
I am quite pleased with the final trailer that our team created but if I had the opportunity to do the project again, I would do a lot of things differently. The main change I would make to the project would be the choosing of the game genre because we chose a genre that we didn’t know a great deal about, the psychological horror genre. I personally believe that we should have chosen the fantasy genre because you are only limited by your imagination and our team has quite a wild imagination. I asked the other members of the team what they thought about the final trailer and their opinions of it were almost exactly the same as mine, “its ok but a lot can be done to improve it”. I asked our team to vote on which trailer they would choose, excluding our own trailer, the votes were three for Zero G by team 42 and one vote for Dark Shock by team Paradox.
Tuesday 8 June 2010
Brief
We have been asked to work in teams of four to come up with a game story and create a game trailer for the final major project which will be shown at the digital showcase on Wednesday 23rd June 2010. We will be creating the scenes of the trailer in various programs, mainly 3ds max and Photoshop. The deadline for all 3d work is the 18th of June so we have to make sure that most of the work is done by then. The end product will be a game trailer that has been created using a professional brief.
We will research professional game trailers to give us a general idea of how it should be laid out.
The client that we have been asked to make the game trailer for is Shipley college. Our team is going to send an email to a few professional game companies to invite them to the digital showcase to see the trailer our team created. The target audience for our team trailer will be anybody aged 16+.
Thursday 13 May 2010
Scripts
Here are the scripts for the trailer scenes that I will be making in 3ds max:
SCENE 3
Fade in
EXT. Forest/village – Night
An eerie silence with the occasional shrieking sound being heard
ELENA (age 20+) is walking through a dark, snow covered forest. She looks nervous as she gets closer to a run down village.
ELENA
(To herself) “I don’t remember
any village being her before”.
ELENA enters the village and notices large pools of blood trailing towards the biggest building in the village.
ELENA (horrified)
“Oh my god”
ELENA hears strange noises coming from the building where the blood trails lead, ELENA decides to investigate the noise.
ELENA enters the building and see’s illegible symbols written on the wall in blood. All but one of the lights in the building are smashed giving very little light to see anything else in the room.
ELENA
(To herself) “What could have done this”?
Suddenly ELENA hears a terrifying noise come closer from within the corridor and as you catch a glimpse of what is making the noise.
Scene ends
SCENE 6
Cut to
EXT. Farm – Day
Sounds of farm animals can be heard around the farm, one particular shrieking stands out from the rest.
JOHN the farmer (40+) is going out his usual business on the when he hears a loud shrieking sound coming from one of the barns.
JOHN
(To himself) What on earth is that?
JOHN decides to go and find out where the strange noise is coming from. JOHN discovers that one of his pigs is making the noise. JOHN is horrified to find that his is giving birth to something that is not of the same species.
JOHN (Screaming)
Aaarrrggghhh
The Trailer ends as you catch a glimpse of what is being born
Tuesday 11 May 2010

Tuesday 4 May 2010
My creature design

The image above is the a sketch of the creature that I am going to make a 3d model of in max. This is just a rough sketch of the creature, which I have named sack man because I am going to eventually model it with a sack like texture. My inspiration for this type of creature design is the typical scarecrow that you find on your average farm because there's something about the way they look that is really creepy.

Here is a rough sketch of what I would like the different parts of my creature to look like, as you can see I have done cross hatching all over the limbs so that it starts to look like the texture you would find on a sack.
 This is an image of my Sack creature sketch that I made but with this image I added colour using Photoshop. I did this so that i could get a general idea of what kind of textures I would like to use on my 3D version. The sack texture I have used on this image is one that I found on the internet but I changed it in Photoshop so that it fit my idea better.
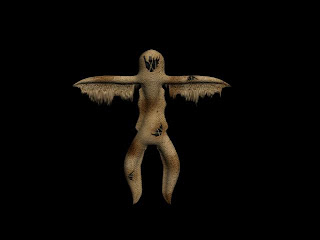 This is a render of my Sack creature that made in 3ds max, as you can see I have made the 3D model look almost exactly like my design idea. I am really happy with this model because it turned out how I wanted it to turn out without the process being too difficult. I didn't come across any problems while I was making the model which I believe is down to the planning I did and my abilities in Photoshop and 3ds max. To make this model I first used the cylinder standard primitives to get the basic body and limbs positioned for modelling. After I did this I started to edit the shape of the cylinders using the editable poly modifier to get the shape I wanted for my creature. After I finished editing the shape of my model I attached the everything together into one object (arm and legs to body and head), I began with the process that I found the hardest to do during the development of this model, the texturing. The first thing I had to do was unwrap the model using the UVW text unwrap modifier, which was an annoying process, after I did this I began to make the texture for the model in Photoshop, which I would then apply to my model. Below is an image of the texture I made for my model.
Thursday 25 March 2010
Case concepts

Here is the first basic concept idea that I came up with for a game logo, as you can see I just did a quick Photoshop job by adding a render of one of my trailer tests over the top of a blank Xbox 360 cover and then adding the text and logo. I think this concept is ok for an idea but it isn’t anywhere near professional enough to be a final game logo design.
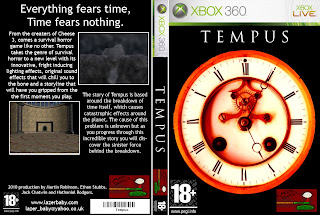
Here is the second concept idea that I came up with, which I prefer to my first idea because it looks a bit more professional made. For this concept I decided to make the back of the case as well the front to make it look more professional. I went with a clock for the front cover image because our game is based around time breaking down so using a clock seemed appropriate. On the back I used some of my renders to look like gameplay shots and then added some information which you would usually expect on the back of a game case.
Here is a video render of a 3d animation I made for the 3d game case model I made.
Thursday 18 March 2010
Environment Drawing

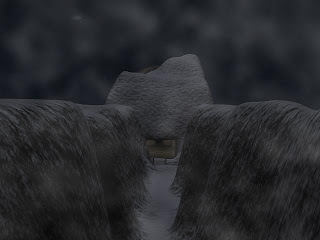
The picture on the left is a scan of a plan for the environment that i am going to make for my trailer scene. The idea the drawing in four different in four different colouring styles, the bottom left is normal black and white shading, the bottom right was is felt tip pens, the top left i used pastels and the top right is coloured crayons. I did this to compare the different styles and see which one looks the best. The image next to my trailer scene environment is a test render of an environment that i am planning to use. By comparing these two images you can see similar features, such as the mountains, but also completely different features, such as the trees.
Friday 5 March 2010
Final, Team Storyboard

This is the final, team storyboard that our group has come up with for the video game trailer. As you can see it is a combination of scenes from our individual storyboards and new scenes specifically made for this storyboard.
My storyboard version

This is my version of the story for our team's game trailer, we all decided to come up with our own storyboard that was loosely based on the story we agreed upon. we did this so that we could compare our storyboards and pick out the best scene idea's and then combine them into our final, team storyboard.
Wednesday 3 March 2010
Team meeting minutes
Meeting happened on 03 March 2010 at 10:20Am in Shipley College in the room SF04
Our group had a team meeting this week to decide what our video game trailer storyboard consists of. The main points we agreed on for the trailer are a big experiment that goes wrong, the trailer starts with the protagonist waking up inside of a toilet suffering from amnesia, a lot strange things happening such as hearing weird noises through a corridor. There will also be a panning shot of the snow environment about half-way through the trailer and at the end of the trailer, after the credits are shown, there will be a flashback clip of a pig giving birth to the main character.
Our group had a team meeting this week to decide what our video game trailer storyboard consists of. The main points we agreed on for the trailer are a big experiment that goes wrong, the trailer starts with the protagonist waking up inside of a toilet suffering from amnesia, a lot strange things happening such as hearing weird noises through a corridor. There will also be a panning shot of the snow environment about half-way through the trailer and at the end of the trailer, after the credits are shown, there will be a flashback clip of a pig giving birth to the main character.
Tuesday 23 February 2010
Ancient building renders
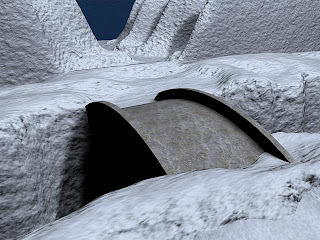
Here are some renders of another environment i have done which is something that looks similar to what you might find in a cathedral or monastery.


Thursday 11 February 2010
Environment Renders


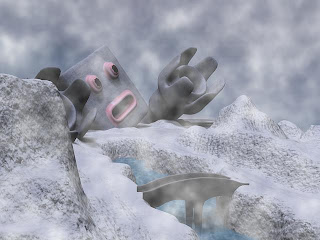
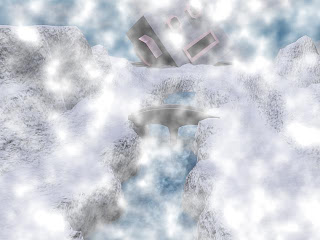
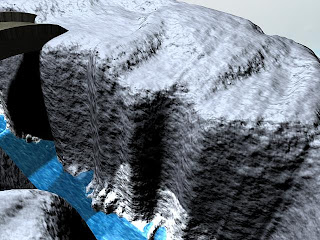
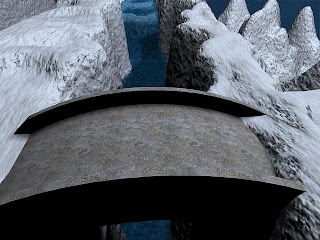
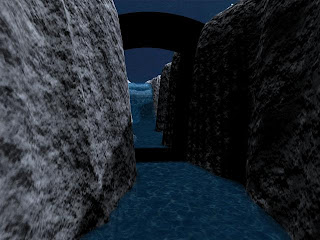 Here are some of the renders of the 3D environment models that i have created in 3ds max. To create these models I have used various techniques such as using a displacement map to make the shape of the environment and basic box modelling techniques to make the bridge and robot. To add more depth to the environment I used an omni light to light up the environment in a more realistic way and add shadows. I textured the robot by first UVW text unwrapping it and then making the texture in Photoshop, shown above in one of the pictures, then added that texture onto the robot in 3ds max using the mateial editor. I made the water by added a tileable water texture onto a plane and turned the transparancy down to give more of a watery effect.
 Friday 29 January 2010


 Here are two renders of the car I textured in 3DSmax by UVW text unwrapping the 3d model and then making the texture in Adobe Photoshop. Under the pictures of the model renders are the textures i made myself, with the exception of the serious cat.
 Tuesday 12 January 2010
Identify the Roles of your Team
Me-level editor-
level editor defines and creates the interactive architecture for a segment of a game which includes the landscapes, the buildings and objects. They have to make sure that are true to the overall design specification, using the characters and the story elements defined by the game designer. They also develop the gameplay for a the level, which includes the challenges that the character must face and also the actions they must take to overcome them.
Ethan-Team leader, Lead Modeller -
The lead is the member of a development team that is in charge of everyone in that team. Their job is to oversee the game development in that particular department. They control the financial and other resources needed for a project and co-ordinate the work of the production team, making sure that the quality and vision of the game is maintained, whatever problems may arise.
Nat-Producer-
The producer is responsible for ensuring the successful delivery of the game, on time and within the budget.
Jack-QA-
A quality assurance technicians, or game testers, perform a vital role in game development by testing, tuning, debugging, and suggesting the detailed refinements that ensure the quality and playability of the finished game. Their job involves them playing a game and testing for bugs in the software
Lazer Baby Game Trailer Teamwork
Our team consists of four people, me, Ethan, Nat and jack. In our first team meeting after the whole group decided who was in the two teams, we thought of a few names that we could have for our team but in the end we decided to have the name Lazer Baby.
My role in the team is to do character and environment design and modelling, animation and texturing. I am doing the environment modelling because that is my main strength.
Ethan's role in the team is the team leader, character/creature and environment design and modelling. Ethan's biggest strength is probably his concept art which is why he is doing the character design.
Jack's role in the team is creature concept art and creative ideas. Jacks strength is his creature concept art which is why he is doing the creature concept art for the team.
Nat's role in the team is character/creature design, creating textures and audio. Nat's strength is his photoshop ability which is why he is creating textures.
Subscribe to:
Posts (Atom)